Recommended Videos
While you begin Tower Blitz with just a single tower type, gameplay gradually unlocks additional towers each with unique strengths and weaknesses. To optimize your strategy, here's our comprehensive tier ranking of every tower in Tower Blitz.
Table of contents
- All Towers In Tower Blitz Ranked
- S-Tier Towers
- A-Tier Towers
- B-Tier Towers
- C-Tier Towers
- D-Tier Towers
All Towers In Tower Blitz Ranked
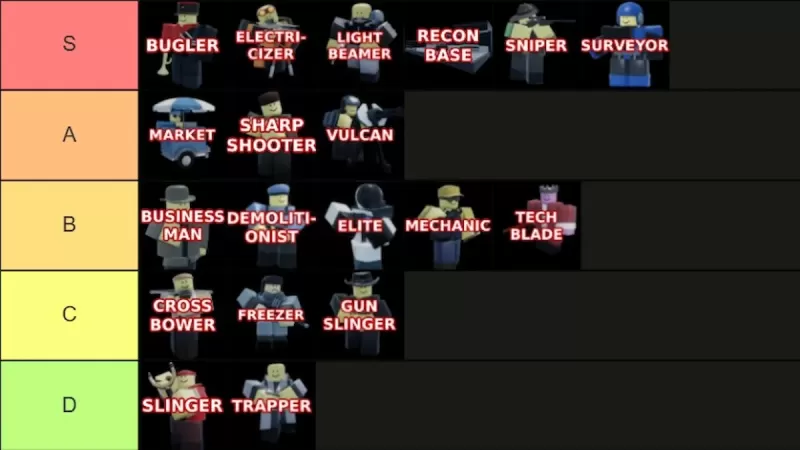
We've organized every in-game tower from S-Tier to D-Tier, evaluating their abilities, upgrade paths, cost efficiency, and performance. S-Tier represents the game's most powerful towers that can dominate any map with proper placement. A-Tier includes strong performers with minor drawbacks. B-Tier contains average towers with situational value. C-Tier towers struggle with limited usefulness, while D-Tier offers the least effective options with minimal utility.
S-Tier Towers
| Tower | Cost | Analysis | Pros and Cons |
|---|---|---|---|
 | Unlock: 2500 Tokens (Level 25) Placement: 750 Cash | Exceptionally powerful despite being support-only. Essential for Expert difficulty. Maximizes effectiveness when paired strategically. Note: Cannot buff Recon Bases. | + Massive performance boost for other towers + Expert mode essential - Purely support role |
 | Unlock: 5500 Tokens Placement: 3800 Cash | The ultimate sniper upgrade with unmatched range and damage. Position near path ends for maximum efficiency against all enemy types. | + Exceptional power and coverage + Dual support/damage capability - High initial investment |
 | Unlock: Complete contract Placement: 1800 Cash | Among the game's most devastating towers when positioned along straight path sections. Both upgrade paths deliver outstanding performance. | + Extreme damage output + Excellent crowd control - Not early-game viable - Significant cost |
 | Unlock: 8000 Tokens (Level 45) Placement: 1000 Cash | Produces constant offensive units that scale with upgrades. The top path offers particularly strong performance. Essential for Hard+ difficulties. | + Continuous unit generation + Both paths powerful + Expert mode staple - Upgrade costs escalate quickly |
 | Unlock: 1500 Tokens Placement: 500 Cash | The premier early-game choice that remains viable throughout play. Bottom path solves firing speed. Maintains value even in Expert mode. | + Best starting tower + Maintains late-game relevance + Strong single-target damage - Moderate attack speed |
 | Unlock: Complete contract Placement: 700 Cash | Remarkably versatile with both support and offensive capabilities. Effective from early to end-game despite placement limitations. | + Flexible role adaptation + Consistent performance - Maximum four placements |
[Rest of the HTML content continues with the same structured format for A-Tier through D-Tier tables]